Cicada

Wie baue ich mir eine elektrische Gitarre?

Moderatoren: clonewood, wasduwolle

Benutzeravatar
pp-guitars
Holzkäufer
Beiträge: 132
Registriert: 20.09.2011, 11:22
Wohnort: Middelfart, Dänemark
Hat sich bedankt: 2 Mal
Danksagung erhalten: 2 Mal

Re: Cicada

#26

Beitrag von pp-guitars » 24.03.2013, 12:11

More work done. Inlay in neck, before the back is routed, and the pearl for the body has been cut.
The trusscover looks like a piece of jewellery, sitting in this black ebony...

Bild

Benutzeravatar
Arsen
Zargenbieger
Beiträge: 1632
Registriert: 22.05.2011, 20:43
Hat sich bedankt: 104 Mal
Danksagung erhalten: 76 Mal

Re: Cicada

#27

Beitrag von Arsen » 25.03.2013, 00:46

Wow!
Nice work, nice woods. ;)
Gruß, Arsen

Benutzeravatar
Poldi
GBB.de-Inventar
Beiträge: 9160
Registriert: 26.04.2010, 06:46
Wohnort: Wanne-Eickel
Hat sich bedankt: 1036 Mal
Danksagung erhalten: 1020 Mal

Re: Cicada

#28

Beitrag von Poldi » 25.03.2013, 05:32

(clap3) (clap3)

Benutzeravatar
pp-guitars
Holzkäufer
Beiträge: 132
Registriert: 20.09.2011, 11:22
Wohnort: Middelfart, Dänemark
Hat sich bedankt: 2 Mal
Danksagung erhalten: 2 Mal

Re: Cicada

#29

Beitrag von pp-guitars » 22.04.2013, 08:34

Got the CNC operator and my camera back from Thailand, so back in action...
Backside of neck routed

Bild

Bild

Bild

Bild

Bild

Bild
http://www.youtube.com/watch?v=Wqd-pKdq ... ata_player

Benutzeravatar
bea
GBB.de-Inventar
Beiträge: 6002
Registriert: 06.05.2011, 11:28
Hat sich bedankt: 164 Mal
Danksagung erhalten: 376 Mal

Re: Cicada

#30

Beitrag von bea » 22.04.2013, 10:19

Fascinating.
What are You doing about the sharp edges at the neck-body transition ?
LG

Beate

Benutzeravatar
pp-guitars
Holzkäufer
Beiträge: 132
Registriert: 20.09.2011, 11:22
Wohnort: Middelfart, Dänemark
Hat sich bedankt: 2 Mal
Danksagung erhalten: 2 Mal

Re: Cicada

#31

Beitrag von pp-guitars » 22.04.2013, 11:11

We rout the neck down to 2/10 of a mm for sanding, with the correct rounding towards the body.. We could easily rout the body for a perfect fit, but in wood, it will leave the transition edges in a mess. Therefore we pull out right before hitting the pocket area....leaving a little bit of material, which I remove manually, after gluing! making a perfect blend.
Bild

Bild

Benutzeravatar
pp-guitars
Holzkäufer
Beiträge: 132
Registriert: 20.09.2011, 11:22
Wohnort: Middelfart, Dänemark
Hat sich bedankt: 2 Mal
Danksagung erhalten: 2 Mal

Re: Cicada

#32

Beitrag von pp-guitars » 03.05.2013, 09:51

wings of body glued together with small dividers of Ramin, with a little less width than the neck. The groove is then routed to be a little bit wider than the neck. The two strips of wenge are now glued inside the neck groove, and the routed again to fit snugly to the neck, leaving about 1mm of Wenge. The two holes in the Ramin are for positioning the body, when we turn the body around for the top rout...before we glue in, the neck.

Bild

Benutzeravatar
pp-guitars
Holzkäufer
Beiträge: 132
Registriert: 20.09.2011, 11:22
Wohnort: Middelfart, Dänemark
Hat sich bedankt: 2 Mal
Danksagung erhalten: 2 Mal

Re: Cicada

#33

Beitrag von pp-guitars » 06.05.2013, 08:05

Backside routed. Note the lid for the electronic cavity routed with a 0.6 bit

Bild

Bild

Benutzeravatar
Gerhard
Moderator
Beiträge: 5273
Registriert: 03.05.2010, 14:19
Wohnort: Zell am See
Hat sich bedankt: 653 Mal
Danksagung erhalten: 576 Mal
Kontaktdaten:

Re: Cicada

#34

Beitrag von Gerhard » 06.05.2013, 08:45

Nice! How will you get the lid out of the cavity? I guess the 0.6 router bit did'nt go all the way through the body? :)

Benutzeravatar
pp-guitars
Holzkäufer
Beiträge: 132
Registriert: 20.09.2011, 11:22
Wohnort: Middelfart, Dänemark
Hat sich bedankt: 2 Mal
Danksagung erhalten: 2 Mal

Re: Cicada

#35

Beitrag von pp-guitars » 06.05.2013, 10:16

No! the depth is only 5mm, that's all you can get out of a bit like that, BUT here's the trick!
The the rout is leaving a few "tabs" on lid, connecting to the body, so when we turn it around, to hollow out the body the rout towards the lid, is a bit bigger, so it leaves a little shelf to hold the support ring that is glued on from the top. The rout goes down to 4 mm from the bottom, but the lid don't "fall out" until the small tabs are cut by a tiny saw blade. This trick can only be done in guitars where you have a "lid/scratch plate or "loose" top...it's one of the stupid things you do when you have a CNC... :D

Here it's done on the Manta....
Bild

Bild

Benutzeravatar
Alex
Moderator
Beiträge: 3529
Registriert: 24.04.2010, 08:43
Wohnort: Lkr. Freising
Hat sich bedankt: 51 Mal
Danksagung erhalten: 74 Mal

Re: Cicada

#36

Beitrag von Alex » 06.05.2013, 11:27

(clap3) (clap3) (clap3)

Benutzeravatar
bea
GBB.de-Inventar
Beiträge: 6002
Registriert: 06.05.2011, 11:28
Hat sich bedankt: 164 Mal
Danksagung erhalten: 376 Mal

Re: Cicada

#37

Beitrag von bea » 06.05.2013, 11:42

Coole Idee.
LG

Beate

Benutzeravatar
pp-guitars
Holzkäufer
Beiträge: 132
Registriert: 20.09.2011, 11:22
Wohnort: Middelfart, Dänemark
Hat sich bedankt: 2 Mal
Danksagung erhalten: 2 Mal

Re: Cicada

#38

Beitrag von pp-guitars » 06.05.2013, 12:44

I saw another builder do that, and we just copied the idea!!

Benutzeravatar
pp-guitars
Holzkäufer
Beiträge: 132
Registriert: 20.09.2011, 11:22
Wohnort: Middelfart, Dänemark
Hat sich bedankt: 2 Mal
Danksagung erhalten: 2 Mal

Re: Cicada

#39

Beitrag von pp-guitars » 09.05.2013, 18:01

Weitergehen!

Hollow parts inside routed. Inside holder for Electronic cavity-lid, routed and mounted. Top Wenge parts glued...
next will be gluing on top, routing the outline and binding channel, from front, removing the spacers, and gluing-in the neck....

Bild

Bild

Benutzeravatar
hansg
Zargenbieger
Beiträge: 1120
Registriert: 23.04.2010, 15:41
Hat sich bedankt: 49 Mal
Danksagung erhalten: 53 Mal

Re: Cicada

#40

Beitrag von hansg » 09.05.2013, 18:12

(clap3) (clap3) (clap3)

Benutzeravatar
pp-guitars
Holzkäufer
Beiträge: 132
Registriert: 20.09.2011, 11:22
Wohnort: Middelfart, Dänemark
Hat sich bedankt: 2 Mal
Danksagung erhalten: 2 Mal

Re: Cicada

#41

Beitrag von pp-guitars » 12.05.2013, 09:27

The Wenge top has been glued on, and the body is planed down to thickness. The contour is done along with the binding channel. To make sure the coordinates are correct for the rout, we have routed 2 holes in the spacers between the body parts. We mount a 22mm MDF plate on the vacuum board, route 2 holes 20mm deep, with same distance as spacer holes, glue 2 round sticks in the holes, and rout the protruding part to fit the holes in the spacers. The CNC will now have the correct coordinates, and back and front will meet within 1-2tenth of a mm.

Bild

All cavities are now routed in the top, except the pickup cavities, which cannot be done before the neck is glued in, and we have the physical pups from Kinman. All cavities are first done as outline with a 1mm mill, to minimize tear up in this delicate pattern. Then a 2mm mill for scrub. The cavities for the inlays have 3 different depth...1mm for Abalone, 1.5mm for Pearl and 3mm for Mazurbirch.

Bild

For a video of the CNC cutting inlay pockets, check http://youtu.be/pXMS9NcBi78 and remember to fasten seatbelts!
The video is realtime speed

Inlays are now ready for the glue

Bild

For closeups go to this page....some pics can be enlarged twice!
http://www.artist-site.dk/guitars/cicada/Cicada.html

Benutzeravatar
pp-guitars
Holzkäufer
Beiträge: 132
Registriert: 20.09.2011, 11:22
Wohnort: Middelfart, Dänemark
Hat sich bedankt: 2 Mal
Danksagung erhalten: 2 Mal

Re: Cicada

#42

Beitrag von pp-guitars » 12.05.2013, 12:31

Cutting is fast....its all the drawings in CAD that takes the time, and also the rigs for fixing the pieces...BUT you will do things, you never dreamt on doing.

Bild

Top now sanded

Bild

Benutzeravatar
bea
GBB.de-Inventar
Beiträge: 6002
Registriert: 06.05.2011, 11:28
Hat sich bedankt: 164 Mal
Danksagung erhalten: 376 Mal

Re: Cicada

#43

Beitrag von bea » 12.05.2013, 14:25

Really nice. And interesting.
But slightly smaller pictures might be easier to view, won't they?
LG

Beate

Benutzeravatar
pp-guitars
Holzkäufer
Beiträge: 132
Registriert: 20.09.2011, 11:22
Wohnort: Middelfart, Dänemark
Hat sich bedankt: 2 Mal
Danksagung erhalten: 2 Mal

Re: Cicada

#44

Beitrag von pp-guitars » 29.05.2013, 07:30

Let's try to turn the picture

got a bit further. Soon the neck will be glued in, and we will rout the pickup pockets

Bild

Benutzeravatar
Walterson
Ober-Fräser
Beiträge: 663
Registriert: 14.06.2011, 11:57
Hat sich bedankt: 2 Mal
Danksagung erhalten: 5 Mal

Re: Cicada

#45

Beitrag von Walterson » 29.05.2013, 07:39

This is almost unreal.......
VG
Walterson

Benutzeravatar
Simon
Moderator
Beiträge: 6621
Registriert: 23.04.2010, 14:11
Wohnort: Tirol
Hat sich bedankt: 535 Mal
Danksagung erhalten: 943 Mal

Re: Cicada

#46

Beitrag von Simon » 29.05.2013, 08:44

This guitar is so beautiful!!!
I really like the shape of the f- hole and the 23rd fret!!!! (clap3)

Benutzeravatar
pp-guitars
Holzkäufer
Beiträge: 132
Registriert: 20.09.2011, 11:22
Wohnort: Middelfart, Dänemark
Hat sich bedankt: 2 Mal
Danksagung erhalten: 2 Mal

Re: Cicada

#47

Beitrag von pp-guitars » 05.06.2013, 09:51

Danke Sehr

A quick shot of progress....
Transition between neck and body done, next will be binding and routing pockets for pickups. Drill holes for strings through body, and rout the pocket for the underpart of Hannes Bridge.
The Pup mounts are done in Ebony, with a little eye-candy-name in MOP dust on the bridge ring

Bild

Benutzeravatar
Alex
Moderator
Beiträge: 3529
Registriert: 24.04.2010, 08:43
Wohnort: Lkr. Freising
Hat sich bedankt: 51 Mal
Danksagung erhalten: 74 Mal

Re: Cicada

#48

Beitrag von Alex » 05.06.2013, 10:35

pp-guitars hat geschrieben:Danke Sehr

A quick shot of progress....
Transition between neck and body done, next will be binding and routing pockets for pickups. Drill holes for strings through body, and rout the pocket for the underpart of Hannes Bridge.
The Pup mounts are done in Ebony, with a little eye-candy-name in MOP dust on the bridge ring
terrific!
Could you make some comments about CNC machining time and then actual sanding time? Would be interested how long it takes you to build this beauty (if this goes into the direction of a trade secret I apologize right in front on)

Thanks
Alex

edit: ich habe mal das Bild aus Deinem Zitat entfernt, die Ladezeit für diesen thread mit verlinkten Bildern wird immer länger.
capricky

Benutzeravatar
pp-guitars
Holzkäufer
Beiträge: 132
Registriert: 20.09.2011, 11:22
Wohnort: Middelfart, Dänemark
Hat sich bedankt: 2 Mal
Danksagung erhalten: 2 Mal

Re: Cicada

#49

Beitrag von pp-guitars » 05.06.2013, 12:47

The procedure of the woodprep are the same as you all are familiar with, except we use our CNC as a 100% straight planer. We all know how difficult it is to get rid of a curve in a board. We use a 30mm planer bit for that, and just run it manually from the keyboard. We have the luxury of 2 big proff vacuum units, so set-up is a joke! All parts are thickness corrected on the CNC leaving 1 or 2 tenth mm for sanding.

Neck:
Top planed on CNC, Truss rod channel routed, with mark at nut for positioning the fretboard =1/2 hour

Fretboard are glued to neckblank, normal routine...

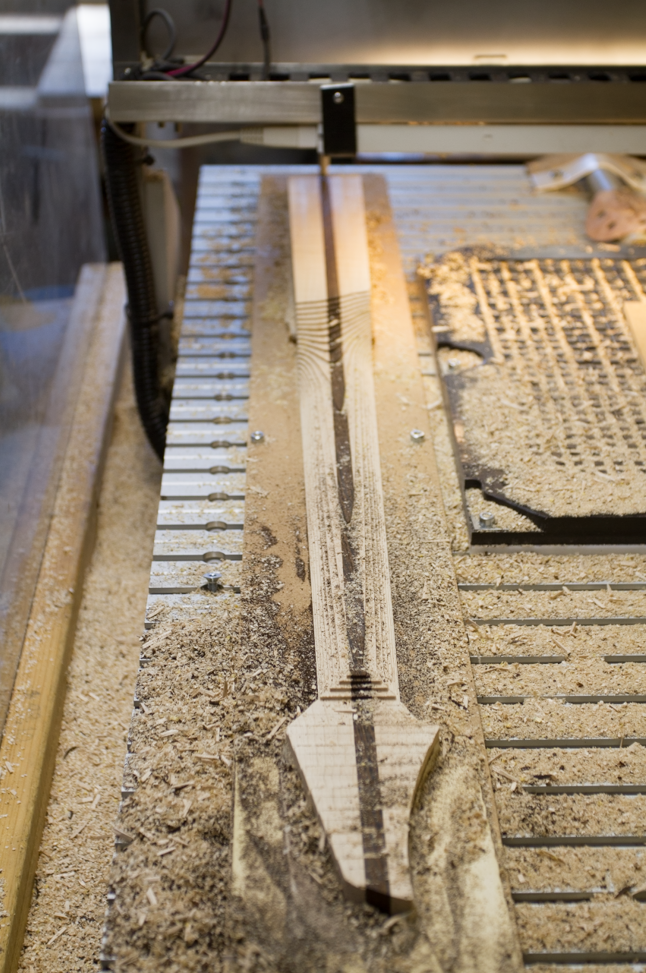
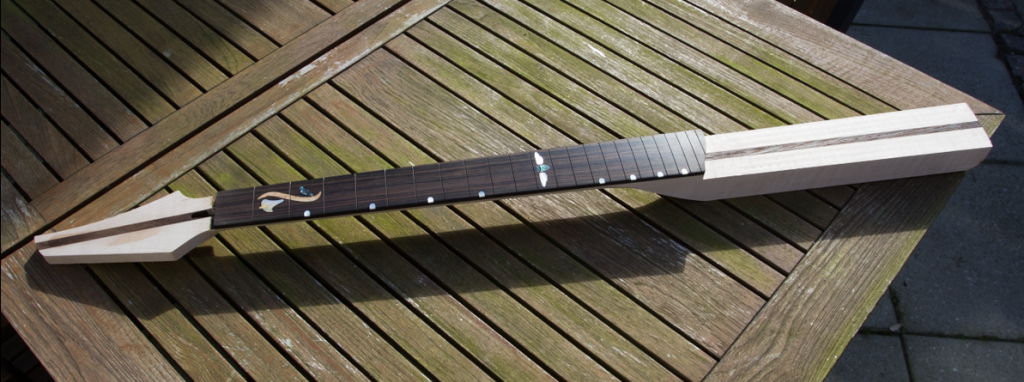
Fretboard radius, slots and inlay pockets, outline of neck and angle of head routed = 2-3 hours

The material are higher than the final size, so the rout don't cut through, and leave the neck with a wall of wood around!
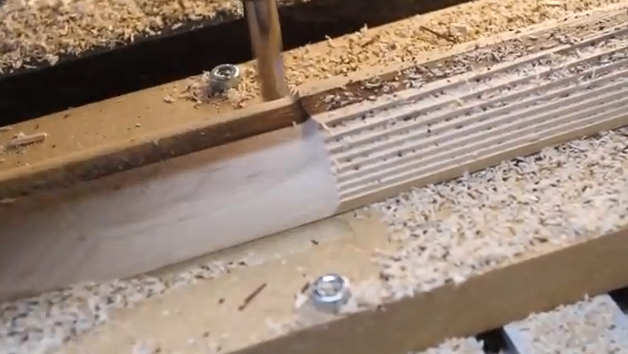
I remove the waste from the neck, and we position a piece of 22mm MDF on the vacuum board, and rout the exact pocket for the fingerboard. Now the CNC knows where the neck is....
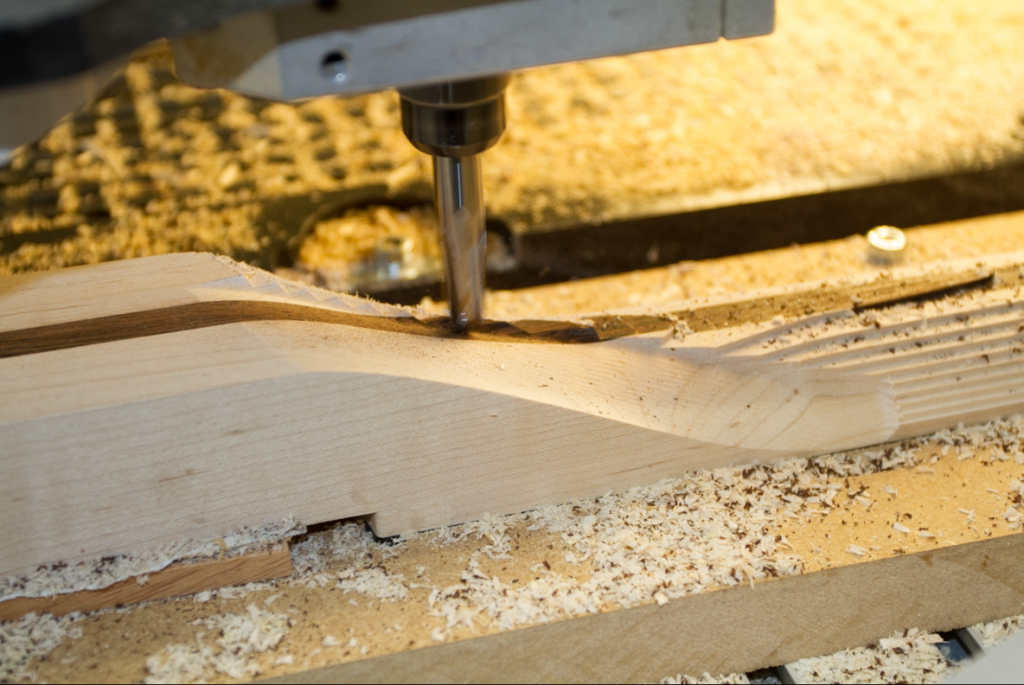
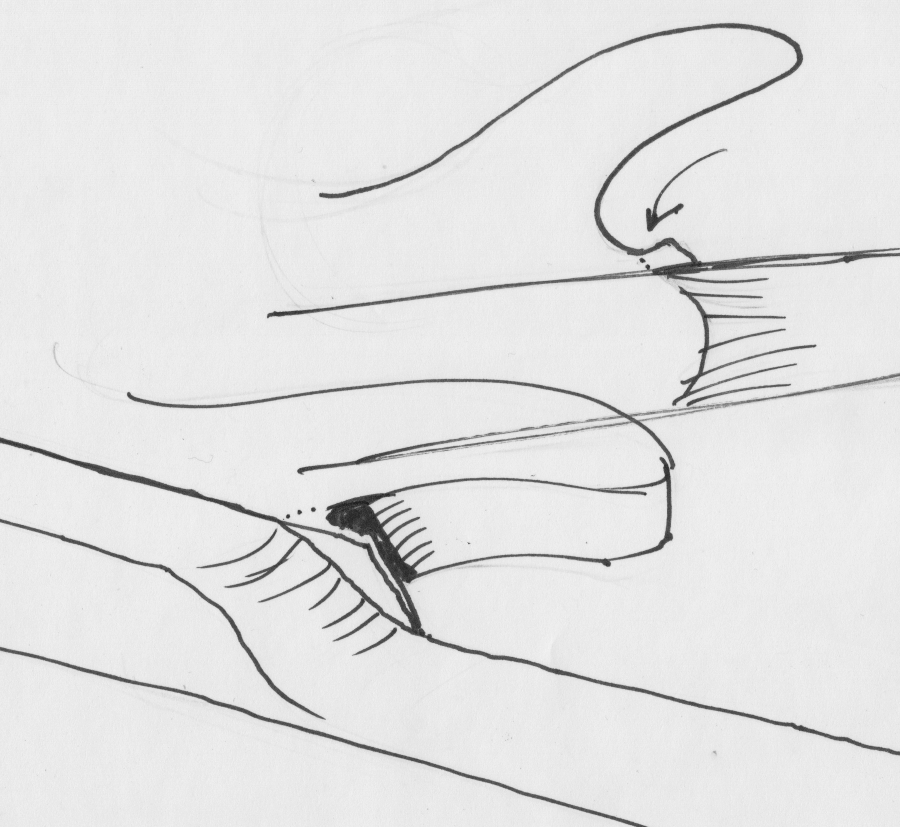
we position the neck, with the board in it's pocket, use doublestick tape to hold the in-body part and the head towards the MDF. At the head I cut a wedge that fits the angle.
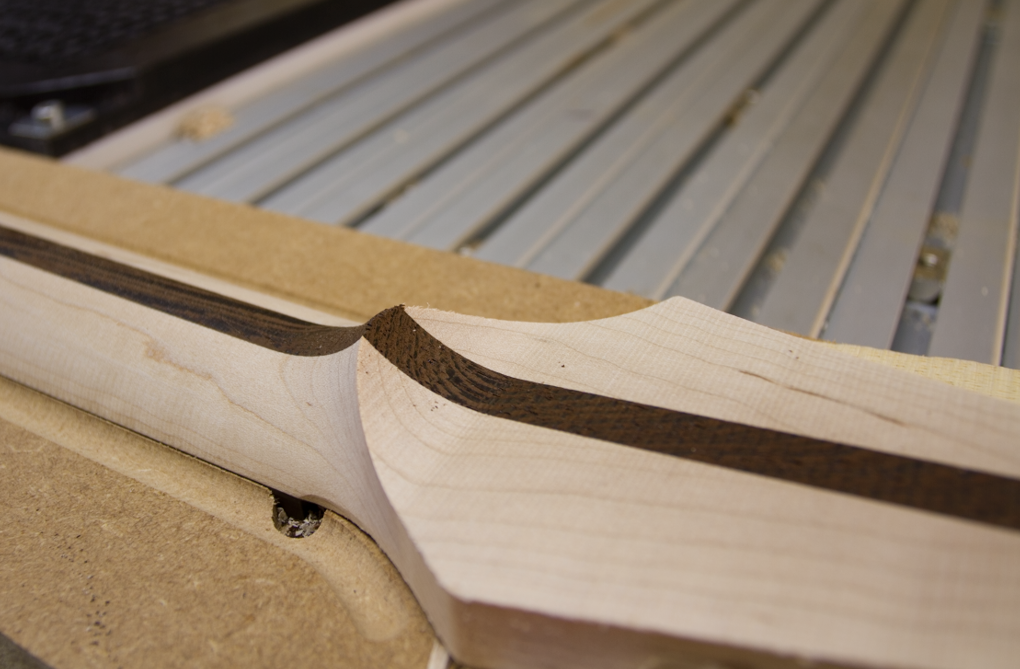
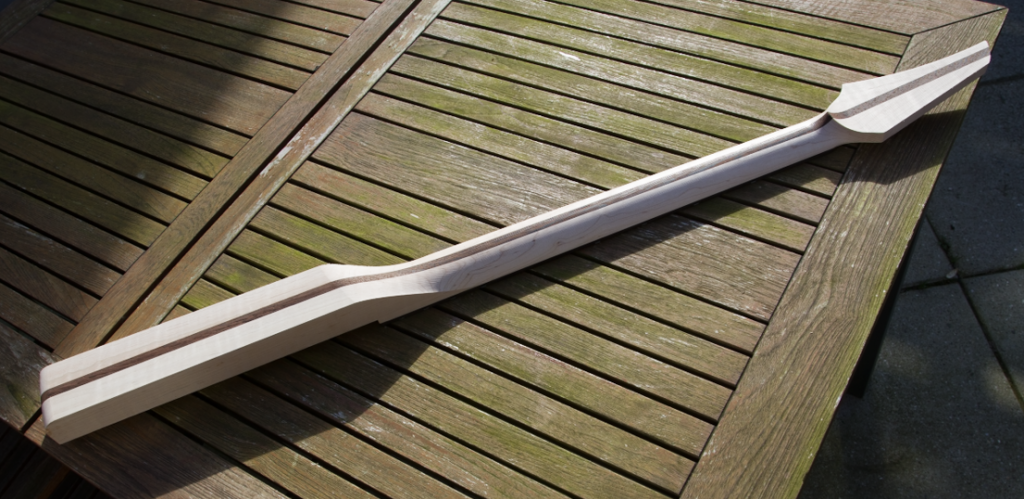
Now we rout the back of the neck....rought with a 12mm flatbit and then a ballnose = 2-3 hours

Inlay and fretting, normal routine...
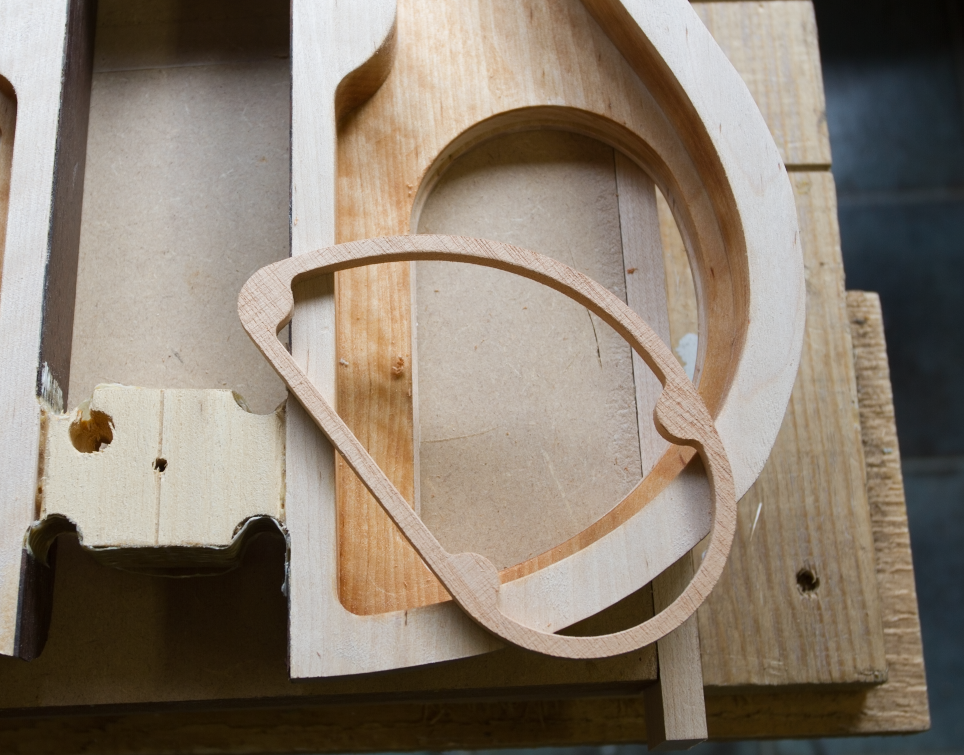
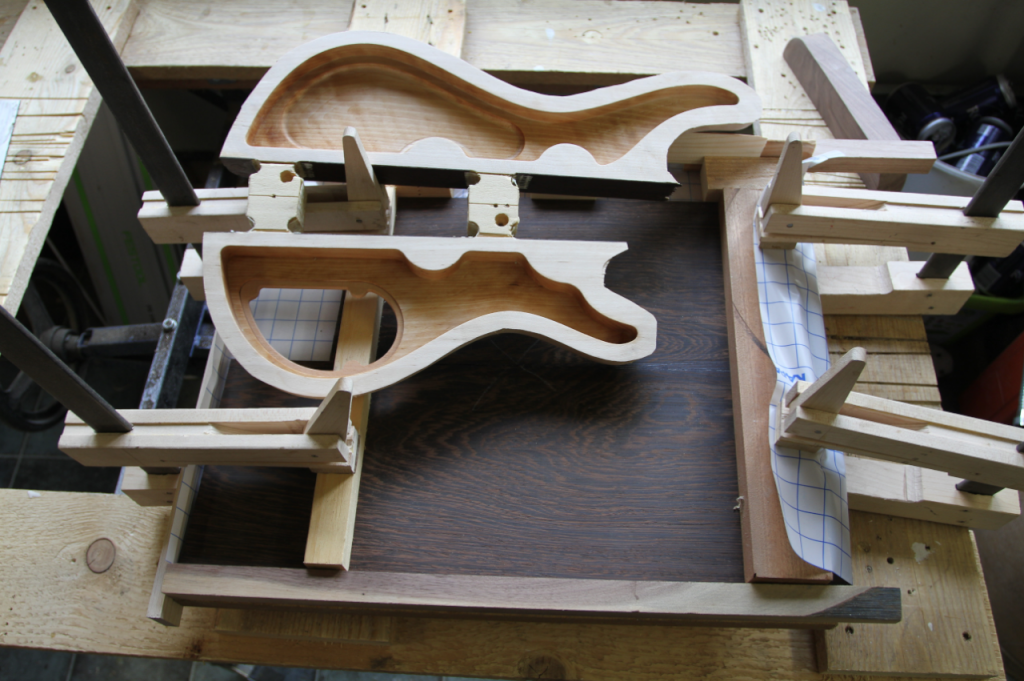
Body:
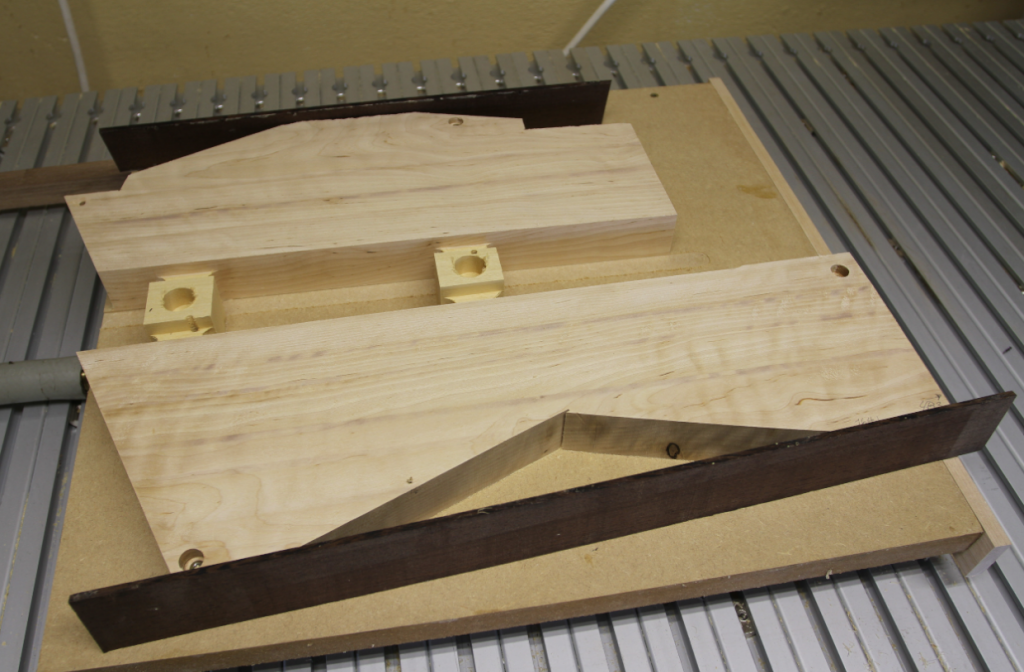
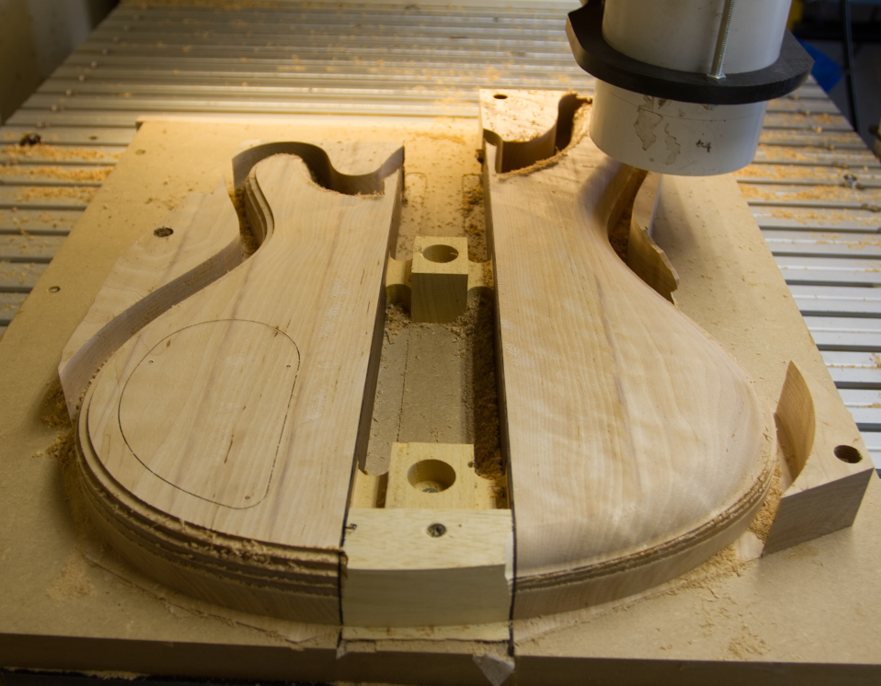
The two bodyparts are positioned with 2 spacers according to plans

Backside routed, rough and ballnose, lid for electronic routed with a 0.6mm bit leaving a few tabs to hold it....for next process.
The channel for the neck are routed, still leaving the spacers in place. = 2-3hours

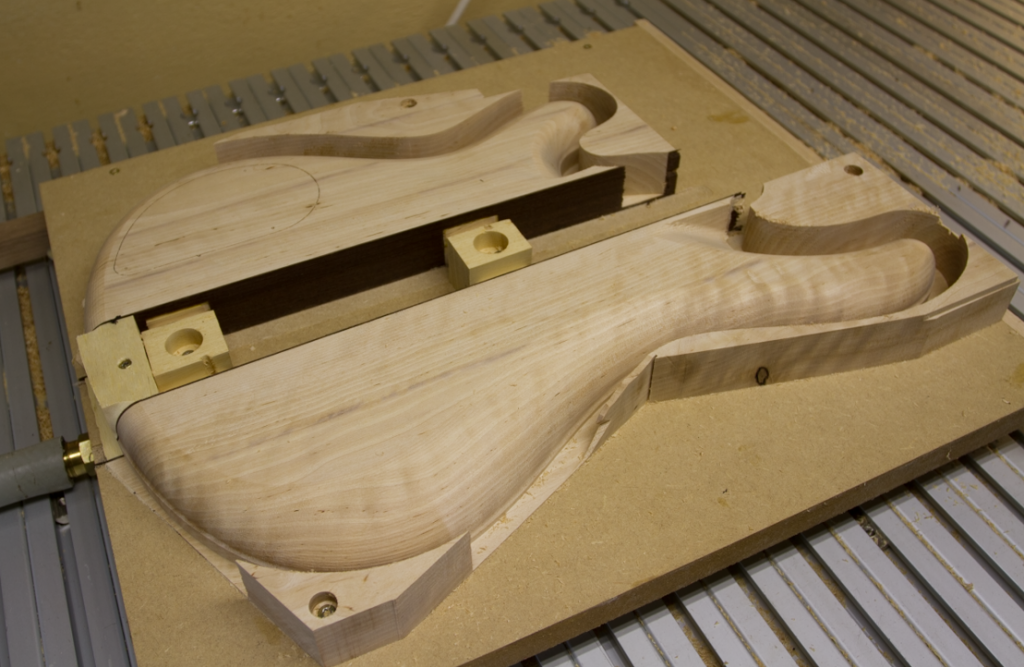
2 stripes of walnut are fitted/glued into the channel....normal routine

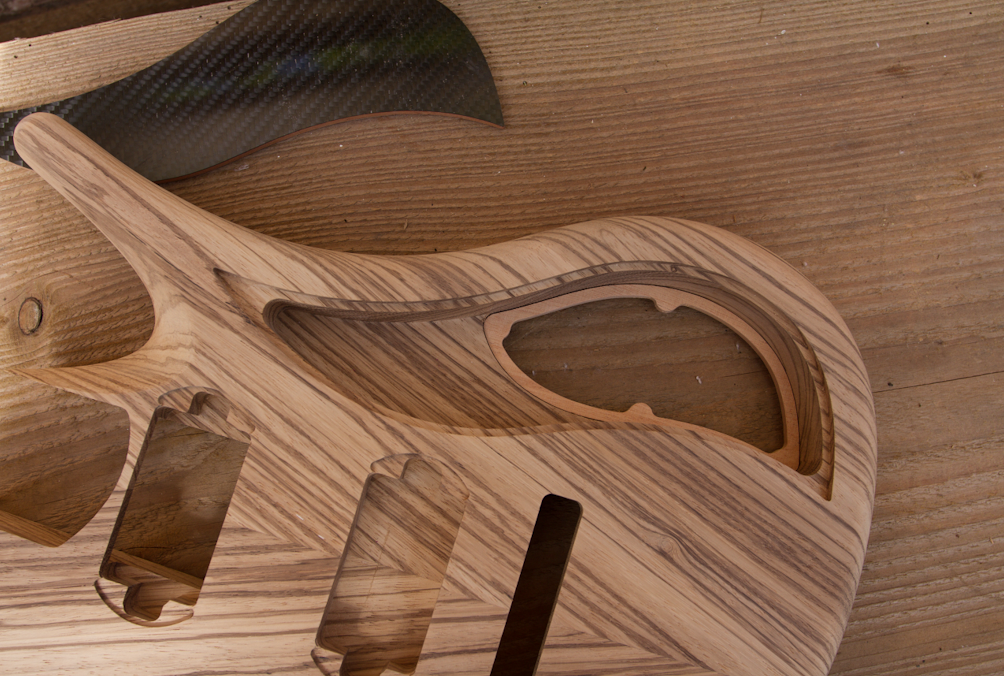
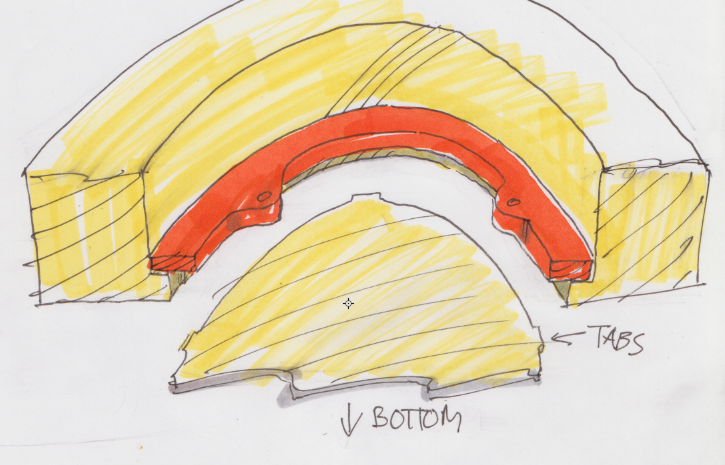
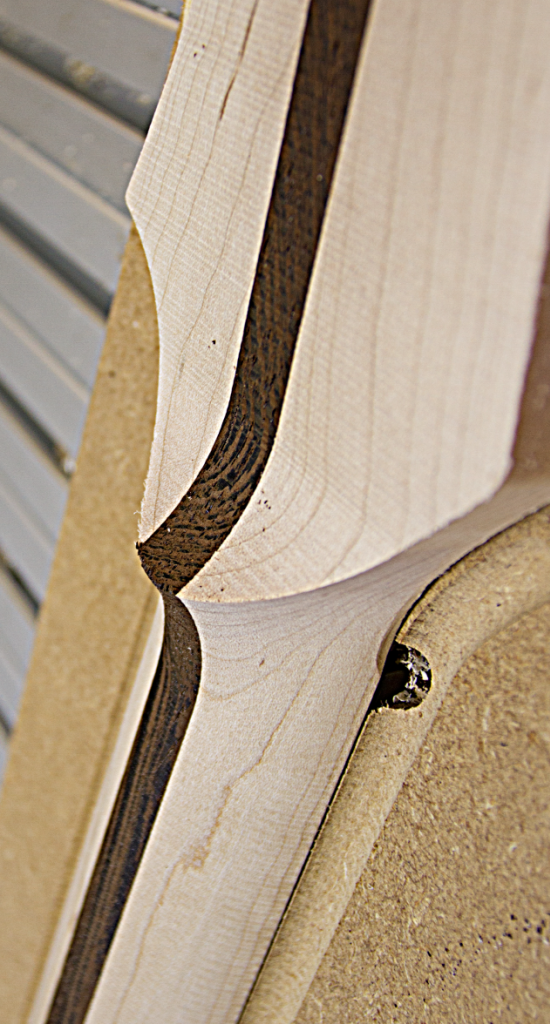
The channel are now routed to final size leaving a 1mm line of walnut in each side, body hollowed and the lid is freed from the tabs holding it. A lid-holder ring are routed, and glued into the body= 3 hours

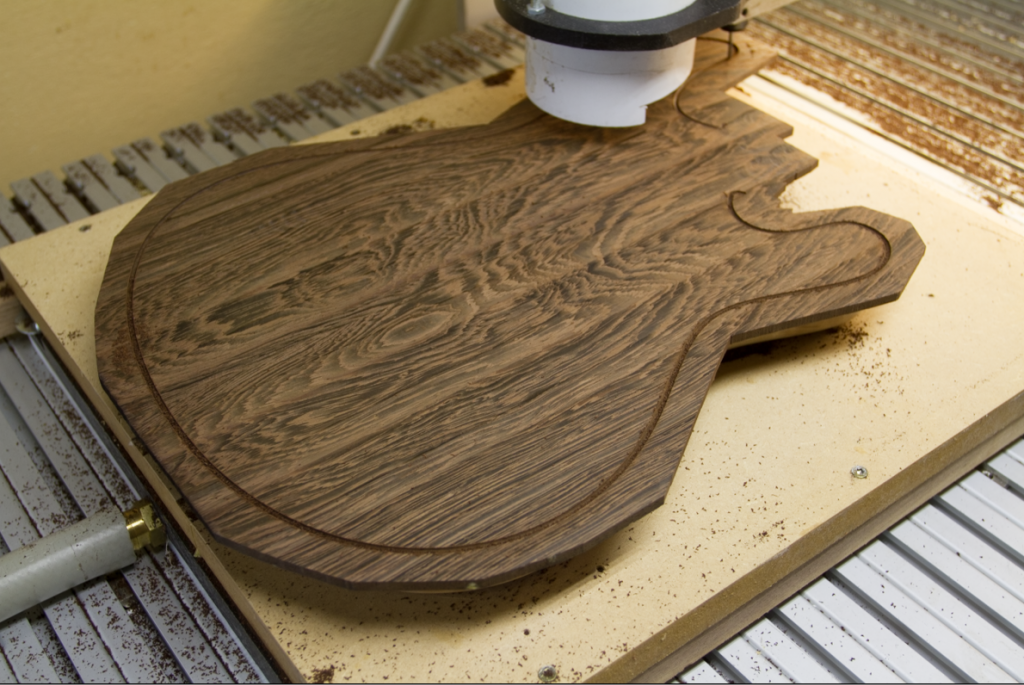
Top glued on....normal...und so weiter...

A MDF board on vacuum are routed for 2 pieces of a stick, that are glued into the MDF and routed to fit the 2 holes in the spacers on the back of the body....now the coordinates are correct for the front rout, outline, binding and pockets and inlay = 3 hours

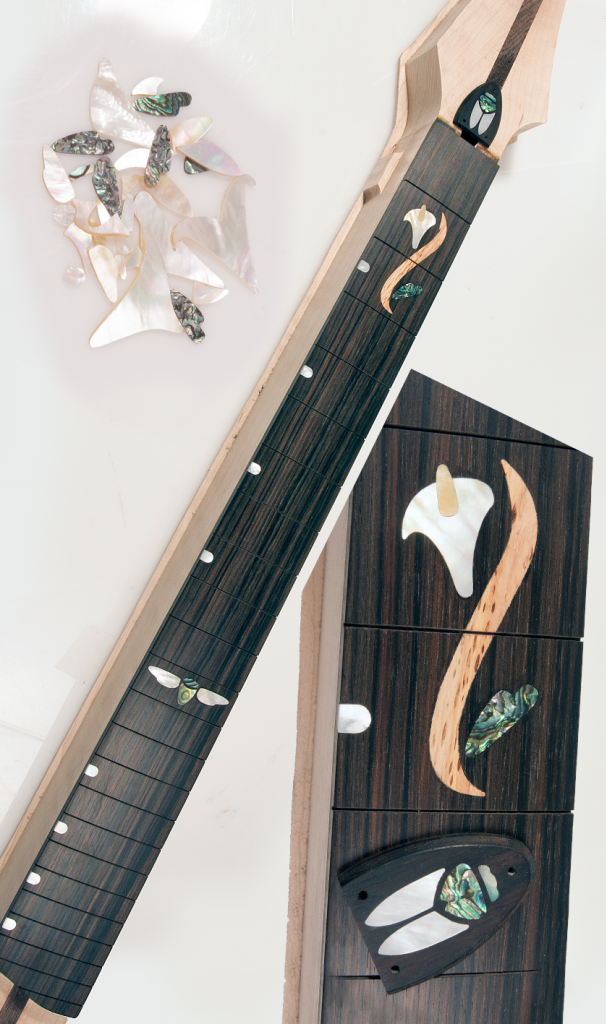
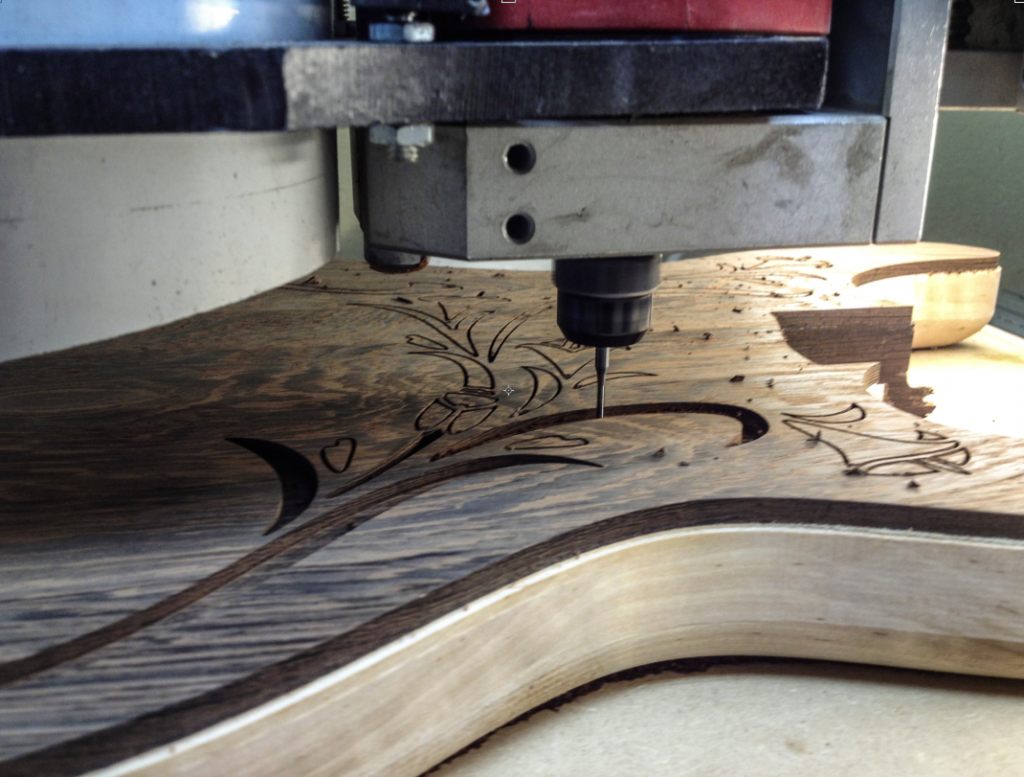
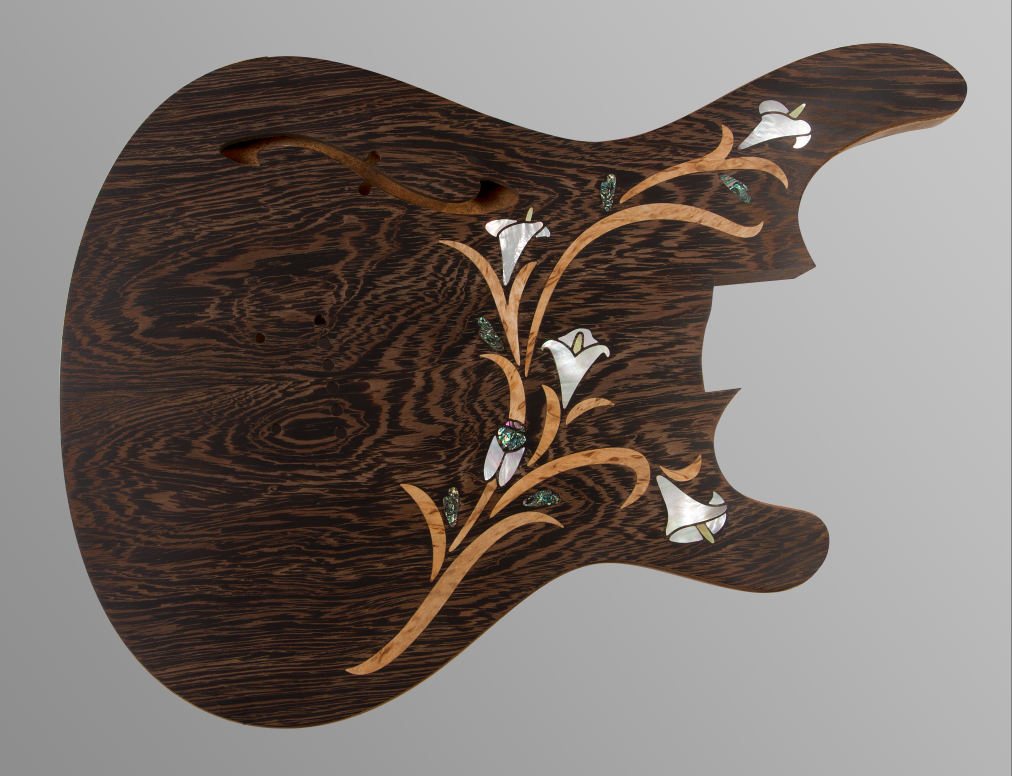
Routing Pearl inlays = 2 hours
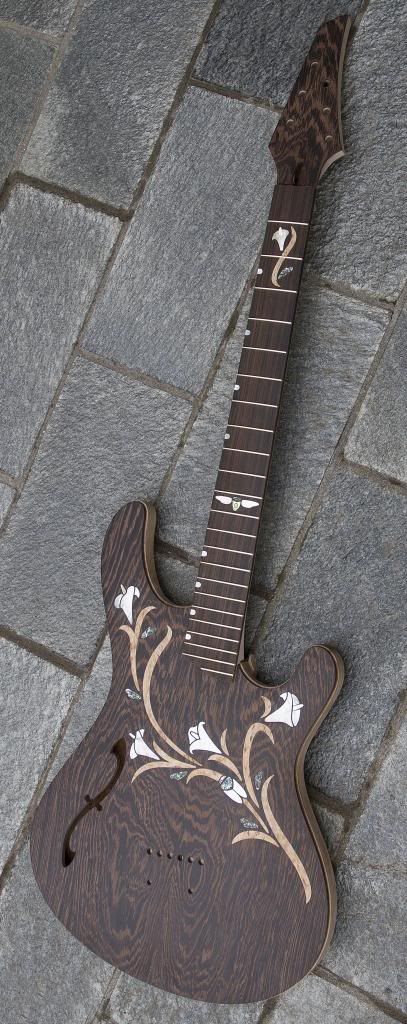
Neck glued in and there will be 1/2 hour of blending the two parts together

Binding....usual business...first time for me...

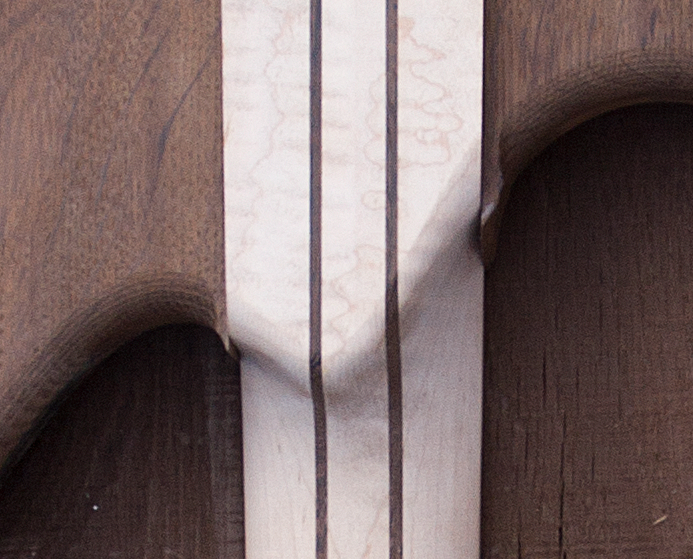
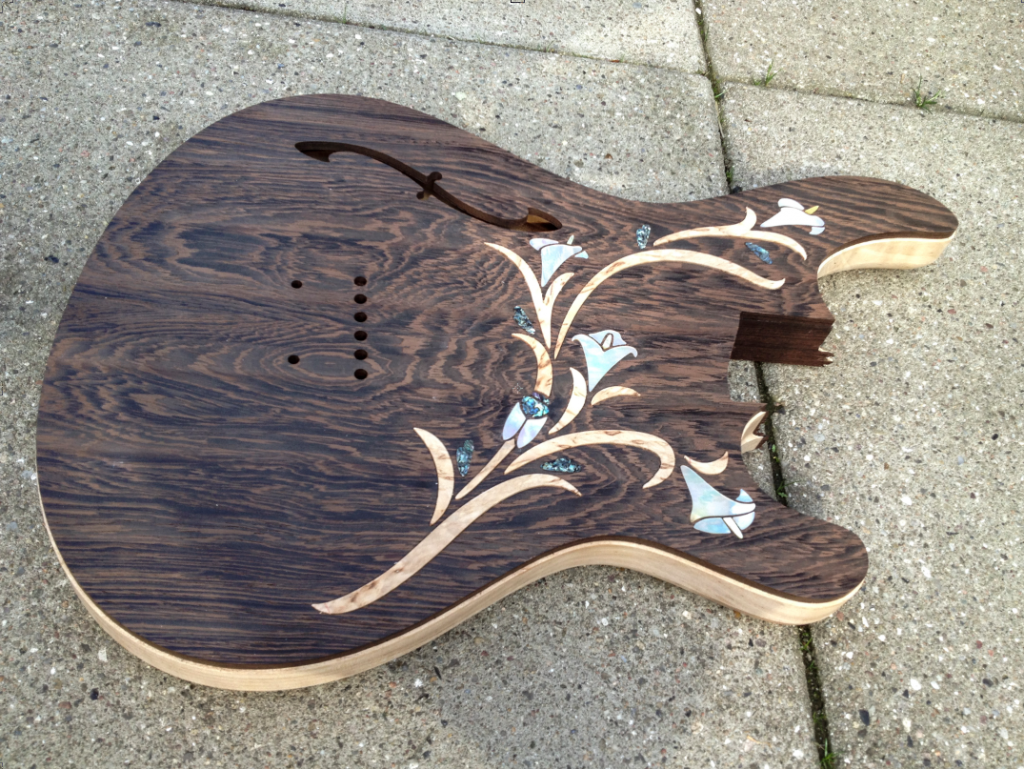
Sanding would be a couple of hours, as the CNC only leaves us with what we want to sand!

The shot is sharpened heavily to show what is left for sanding. It can be done finer, more time consuming, but this is where we want to stop.

Bild

BUT IMPORTANT the 17 hours are only "machine time" under ideal conditions, and no sudden changes in design.

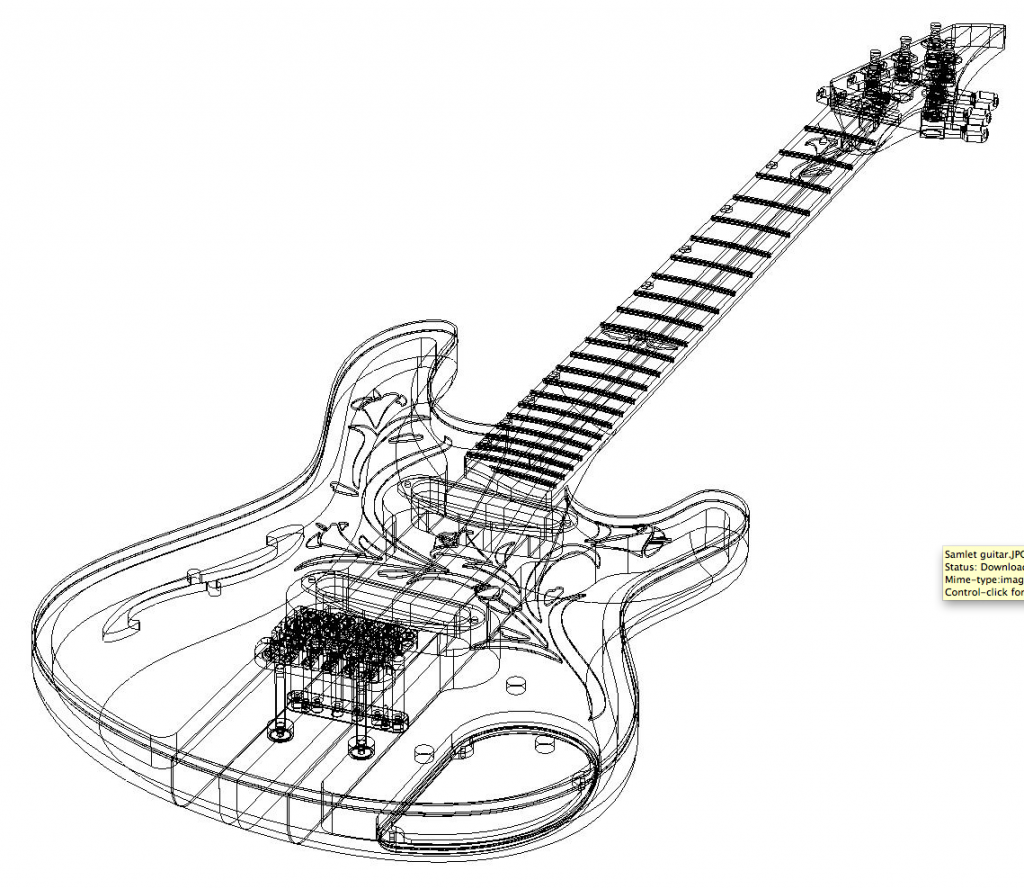
All the drawing, Cad Cam and technical preparation are easy 14 hours, and don't include small ideas or changes.

The manual "normal routine" has to be added....whatever that is!

Hope this gives an impression of the work routine

Benutzeravatar
Alex
Moderator
Beiträge: 3529
Registriert: 24.04.2010, 08:43
Wohnort: Lkr. Freising
Hat sich bedankt: 51 Mal
Danksagung erhalten: 74 Mal

Re: Cicada

#50

Beitrag von Alex » 05.06.2013, 13:38

thanks a lot for the detailed answer!

Antworten

Zurück zu „E-Gitarre“

Wer ist online?

Mitglieder in diesem Forum: 0 Mitglieder und 52 Gäste